English
 Espaol
 Franais
 阿拉伯
阿拉伯 中文
中文 Deutsch
 Italiano
 Português
 日本
日本 韩国
韩国 български
 hrvatski
 esky
esky Dansk
Dansk Nederlands
 suomi
suomi Ελληνικ
 印度
印度 norsk
norsk Polski
 Roman
Roman русский
 Svenska
我们是***的John Deere约翰迪尔强鹿柴油机曲轴前油封的安装技巧 供应服务商.我们可提供John Deere约翰迪尔强鹿柴油机曲轴前油封的安装技巧 销售维修保养零配件服务.John Deere约翰迪尔强鹿柴油机曲轴前油封的安装技巧 想要更多的类型,请现在联系湖南英珀威机械有限公司!

产品中心
John Deere约翰迪尔强鹿柴油机曲轴前油封的安装技巧
详细描述
John Deere约翰迪尔强鹿柴油机曲轴前油封的拆卸方法与标准值参数
1. Remove poly-vee belts.
2. Remove vibration damper/pulley or pulley fromcrankshaft as previously instructed in this group.
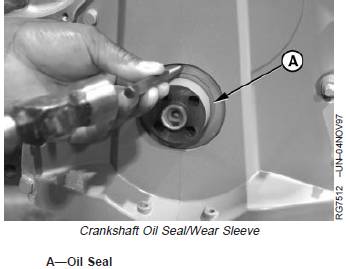
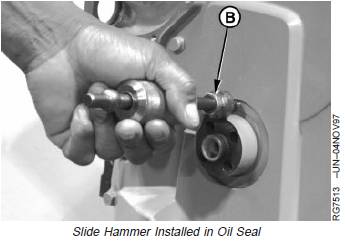
3. Check oil seal (A) for wear, damage, or leakage.
IMPORTANT: On unitized oil seal applications holesmust be drilled at outer edge of sealcase. Screws will pull seal against wearring, thereby removing both pieces.
4. Center punch seal casing at 12 o’clock position anddrill 1/8 in. hole in casing.
5. Remove seal from timing gear cover using JDG22 Seal Remover or JDG719 Seal Puller Adapter along with
JDE38-2 Shank and JDE38-3 Slide Hammer (B). Be careful not to damage seal bore in timing gear cover.
B—Seal Removing Tool
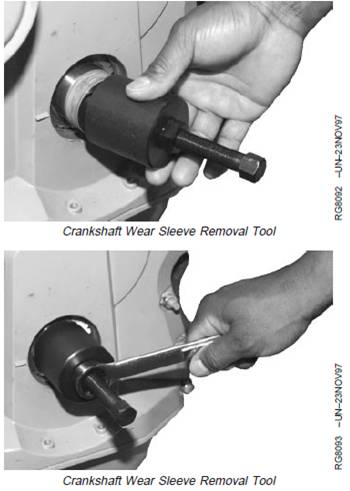
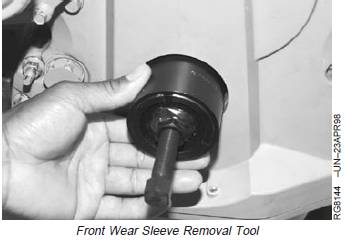
Remove Crankshaft Wear Sleeve—Two Piece Seal (IfEquipped)
1. Rotate crankshaft using JDE81-1 or JDE83 FlywheelTurning Tool and lock flywheel with JDG1571 orJDE81-4 Timing Pin.
2. Back out forcing screw and position collet fromJDG992-1 Front Wear Sleeve Puller onto crankshaftflange until threaded ID contacts wear sleeve.
NOTE: You may want to apply inward pressure on colletas it is threaded onto wear sleeve.
3. Thread collet onto wear sleeve and tighten securely.Use a long breaker bar and tighten collet until wearsleeve spins on crank flange.
4. Lubricate threads of forcing screw. Tighten forcingscrew until flange on wear sleeve is at least 4 mm(0.16 in.) from crankshaft gear.
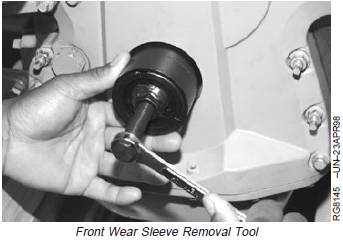
5. Loosen forcing screw and remove threaded collet fromwear sleeve.
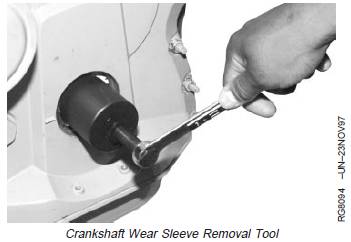
6. Position three 313727 Split Collets from JDG992-2Front Wear Sleeve Puller (using narrower lip) aroundOD of wear sleeve flange with 221761 End Cap and311099 Forcing Screw.
7. Slide 221760 Sleeve over collets to secure pullerassembly.
NOTE: If wear sleeve flange begins to roll duringremoval, remove puller assembly and use thewider lip of collets to grasp wear sleeve.
8. Tighten forcing screw until wear sleeve is removedfrom crankshaft flange.
9. Clean crankshaft flange using Brake Kleen, IgnitionCleaner, or equivalent.
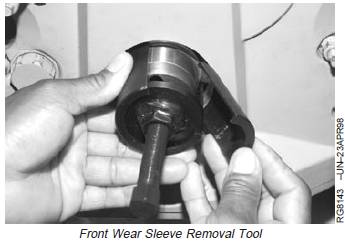
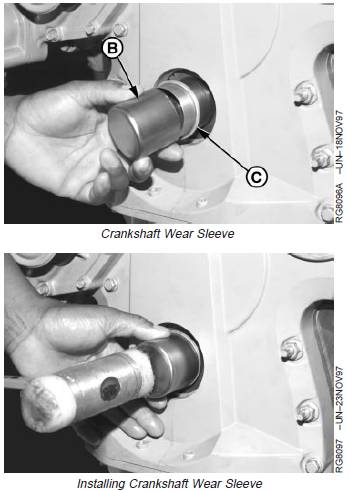
Install Crankshaft Wear Sleeve—Two Piece Seal
NOTE: Some engines manufactured in 1999—2000 arenot equipped with front wear sleeves; however,wear sleeve is recommended for servicewhenever front oil seal is replaced.
1. Coat ID of new wear sleeve with LOCTITEâ 680Retaining Compound.
2. Place wear sleeve (A) on nose of crankshaft withflange of sleeve toward crankshaft.
A—Wear Sleeve

NOTE: Later engines with electronic fuel systems (VP44or DE10 injection pumps) and all four-valve headengines will have a timing wheel on the front ofthe crankshaft.
3. Position installation tool (B) provided in front wearsleeve kit over wear sleeve (C). Using a dead blowhammer, install wear sleeve to proper depth. SeeFRONT OIL SEAL/WEAR SLEEVE INSTALLATIONTABLE earlier in this procedure.
4. Clean any sealant from OD of crankshaft flange andwear sleeve.
B—Installation Tool
C—Wear Sleeve
John Deere约翰迪尔强鹿柴油机曲轴前油封的安装技巧
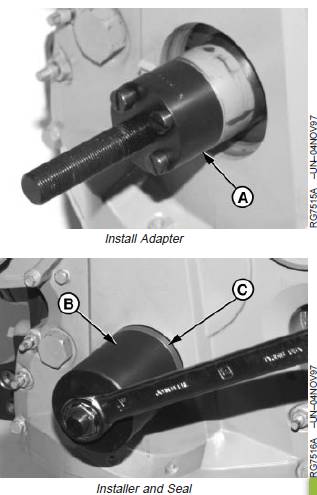
Install Front Crankshaft Oil Seal or Unitized OilSeal/Wear Sleeve—Straight Nose Crankshaft
NOTE: For proper seal installation depth, see FRONTOIL SEAL/WEAR SLEEVE INSTALLATIONTABLE earlier in this procedure.
1. Inspect and clean seal bore in timing gear cover.Check for nicks or burrs. Use a medium-grit emerycloth to smooth rough areas.
IMPORTANT: To ensure proper sealing, the OD of thecrankshaft and wear sleeve MUST BEcleaned with Brake Kleen, IgnitionCleaner, or equivalent and dried prior toinstalling seal (C).
2. Place JDG954-2 Adapter (A) on nose of crankshaftand tighten cap screws.
IMPORTANT: DO NOT allow oil to contact coating onOD of seal.
3. Apply a light coating of clean engine oil to lips of sealand position seal (C) on crankshaft flange. (Thespring-loaded side of seal goes into timing gear coverfirst.)
4. Slide Spacer JDG954-4 onto adapter.
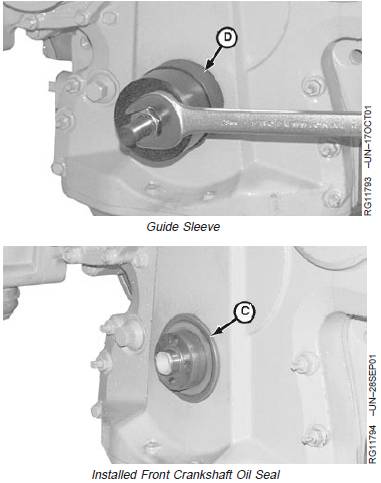
5. Place JDG954-1 Installer (B) over adapter.NOTE: Guide sleeve is equipped with a notch to clear thecast indicator mark on some early timing gearcovers.
6. Place JDG954-6 Guide Sleeve (D) over installer andseal.
7. Tighten nut until seal is installed flush with face oftiming gear cover.
A—Adapter
B—Installer
C—Seal
D—Guide Sleeve
8. Install vibration damper/pulley or pulley on crankshaft.(See INSTALL PULLEY OR VIBRATION DAMPERAND PULLEY in this group.)
9. Install poly-vee belts.
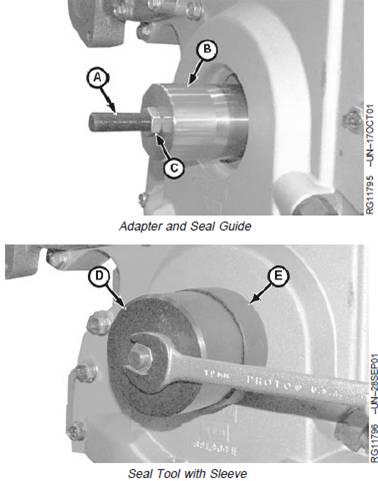
Install Front Crankshaft Oil Seal or Unitized OilSeal/Wear Sleeve—Tapered Nose Crankshaft
NOTE: For proper seal installation depth, see FRONTOIL SEAL/WEAR SLEEVE INSTALLATIONTABLE earlier in this procedure.
1. Inspect and clean seal bore in timing gear cover.Check for nicks or burrs. Use a medium-grit emerycloth to smooth rough areas.
IMPORTANT: To ensure proper sealing, the OD of thecrankshaft and wear sleeve MUST BEcleaned with Brake Kleen, IgnitionCleaner, or equivalent and dried prior toinstalling seal.
2. Install JDG954-8 Forcing Screw (A) into nose ofcrankshaft until screw seats in bottom of crankshaft.
3. Place JDG954-7 Adapter (B) on forcing screw andfasten with nut (C).
IMPORTANT: DO NOT allow oil to contact coating onOD of seal.
4. Apply a light coating of clean engine oil to lips of sealand position seal on crankshaft flange. (Thespring-loaded side of seal goes into timing gear coverfirst.)
NOTE: Guide sleeve is equipped with a notch to clear thecast indicator mark on some early timing gearcovers.
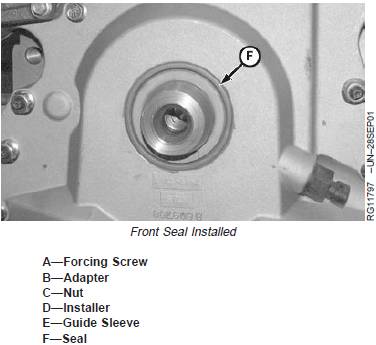
5. Place JDG954-1 Installer (D) over adapter. PlaceJDG954-6 Guide Sleeve (E) over installer and seal.
6. Install washer and nut onto adapter. Tighten nut untilseal (F) is installed flush with face of timing gear cover.
7. Install vibration damper/pulley or pulley on crankshaft.(See INSTALL PULLEY OR VIBRATION DAMPERAND PULLEY in this group.)
8. Install poly-vee belts.