English
 Espaol
 Franais
 阿拉伯
阿拉伯 中文
中文 Deutsch
 Italiano
 Português
 日本
日本 韩国
韩国 български
 hrvatski
 esky
esky Dansk
Dansk Nederlands
 suomi
suomi Ελληνικ
 印度
印度 norsk
norsk Polski
 Roman
Roman русский
 Svenska
John Deere约翰迪尔强鹿柴油发动机拆卸安装技术手册供应商,John Deere约翰迪尔强鹿柴油发动机拆卸安装技术手册技术价格规格咨询服务,John Deere约翰迪尔强鹿柴油发动机拆卸安装技术手册零配件供应,John Deere约翰迪尔强鹿柴油发动机拆卸安装技术手册售后服务中心,John Deere约翰迪尔强鹿柴油发动机拆卸安装技术手册,John Deere约翰迪尔强鹿柴油发动机拆卸安装技术手册详细的技术参数,

产品中心
John Deere约翰迪尔强鹿柴油发动机拆卸安装技术手册
详细描述
John Deere约翰迪尔强鹿柴油发动机拆卸安装技术手册
In some applications, it may be necessary to remove
engine from machine to service cylinder head. Refer to
your Machine Technical Manual for engine removal
procedure.
CAUTION: After operating engine, allow exhaustsystem to cool before working on engine.Do NOT drain coolant until the coolanttemperature is below operating temperature.Remove radiator filler cap only when the cap iscool enough to touch with bare hands. Slowlyloosen cap to first stop to relieve pressurebefore removing completely.
1. Drain engine oil and coolant.
2. Remove air intake line and intake line betweenturbocharger and intake manifold.
3. Remove exhaust line from turbocharger.
NOTE: Turbocharger may be removed from engine whileassembled to exhaust manifold, if desired.
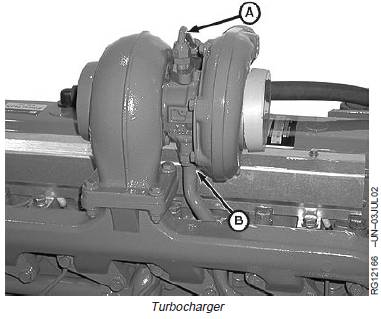
4. On turbocharged engines, disconnect turbocharger oilinlet line (A) and oil drain line (B). Removeturbocharger from exhaust manifold. (See REMOVETURBOCHARGER in Group 080.)
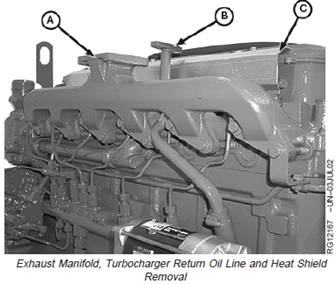
5. Remove exhaust manifold (A).
6. Remove turbocharger oil drain line (B) and heat shield(C).
7. Remove sleeve (D) from each exhaust port.
8. Remove thermostat housing (E), coolant manifold andside port. See REMOVE AND INSTALL COOLANT
MANIFOLD, THERMOSTATS AND SIDE PORT(FOUR-VALVE HEAD) in Group 070.
A—Exhaust Manifold
B—Turbocharger Oil Drain Line
C—Heat Shield
D—Sleeve
E—Thermostat Housing

9. Loosen cap screws (C), remove fan belt (B) andremove cap screws (C) with pulley.
10. Remove bracket (A) from engine.
11. Remove plate (D) from engine.
A—Bracket
B—Fan Belt
C—Cap Screws (4 used)
D—Plate

12. Remove fuel filters (A) and (B) and mounting bracketsas required.
13. Remove fuel supply pump (C). Inspect face of fuelsupply pump lever for wear. If worn flat or concave,replace fuel supply pump.
14. Remove fuel delivery lines (D).
15. Remove glow plug harness with rail (H) from engine.
16. Disconnect fuel leak-off line nut (G) and tee fitting nut(F) at each tee fitting.
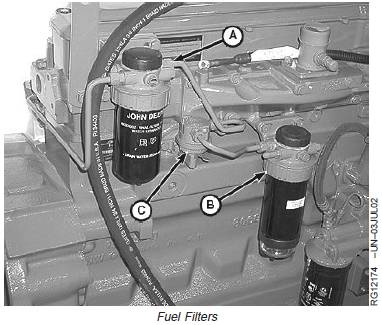
17. Remove fuel leak-off line assembly (E) from engine.
18. Remove alternator, if desired. (See REMOVE ANDINSTALL ALTERNATOR in Group 100.)
A—Final Fuel Filter
B—Primary Fuel Filter/Water Separator
C—Fuel Supply Pump
D—Fuel Delivery Line
E—Fuel Leak-Off Line Assembly
F—Tee Fitting Nut
G—Fuel Leak-Off Line Nut
H—Glow Plug Harness Rail
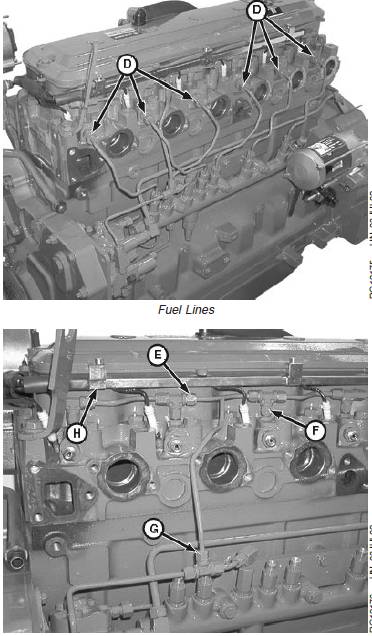
19. Remove button plugs (B) from rocker arm cover.
20. Remove cap screws with O-rings (A) and rocker armcover.
A—Cap Screw with O-ring
B—Button Plug
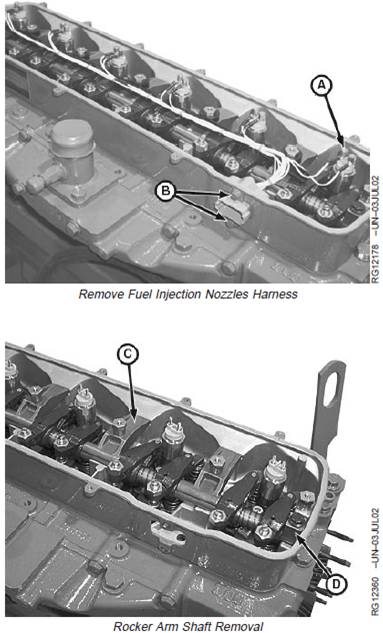
21. Remove two cap screws (B) and nut (A) on all fuelinjectors. Remove fuel injection nozzle harness.NOTE: Loosen all rocker arm adjusting screws prior toremoving assembly.
22. Remove both end clamclamps (D), clamps (C) and rockerarm shaft assembly.
A—Nut
B—Cap Screw (2 used)
C—Clamp
D—End Clamp
23. Remove all push rods (A) and identify for reassemblyin the same location. Clean and inspect push rods.
24. Remove all bridges (B) and identify for reassembly inthe same location.
A—Push Rod
B—Bridge

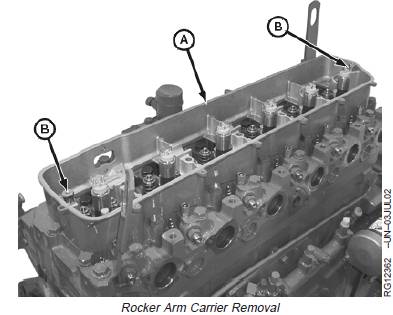
25. Remove screws (B) and rocker arm carrier (A).
A—Rocker Arm Carrier
B—Screw
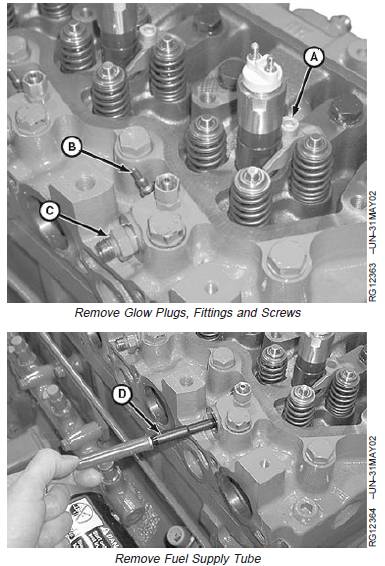
26. Remove glow plug (B), fitting (C) and screw (A) fromeach cylinder.
27. Remove fuel supply tube (D) using a magnet.
28. Remove fuel injector with clamp using JDG1652Injector Nozzle Removal Tool (E).
A—Screw
B—Glow Plug
C—Fitting
D—Fuel Supply Tube
E—JDG1652 Injector Nozzle Removal Tool
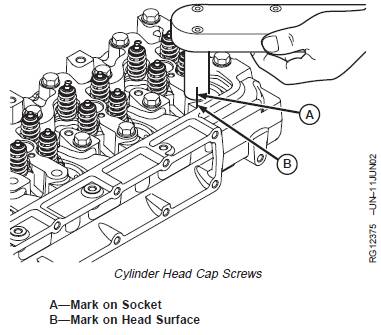
29. If a cylinder head gasket failure has occurred, checkand record torque on each cylinder head cap screwbefore removing.To check cylinder head cap screw torque:
a. Make a reference mark (in-line) on socket (A) andcylinder head surface (B).
b. Loosen cap screw at least 1/2 turn.
c. Retighten cap screw (using a torque wrench) untilreference marks align. Record torque.
30. Remove all cylinder head cap screws.
IMPORTANT: DO NOT use screwdrivers or pry barsbetween cylinder block and head toloosen head gasket seal. Screwdriversor pry bars can damage cylinder headand block gasket surfaces.
31. Lift cylinder head (A) from block. If cylinder headsticks, use a soft hammer to tap cylinder head.
A—Cylinder Head

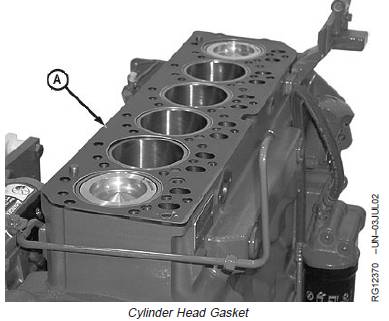
32. Remove cylinder head gasket (A). Inspect for possibleoil, coolant, or combustion chamber leaks. Also,check for evidence of incorrect head gasket beingused.
NOTE: Do not rotate crankshaft with cylinder headremoved unless cylinder liners are secured withcap screws and large flat washers. (SeeMEASURE CYLINDER LINER STANDOUT[HEIGHT ABOVE BLOCK], later in this group.)
A—Head Gasket