 English
 Espaol
 Franais
 阿拉伯
阿拉伯 中文
中文 Deutsch
 Italiano
 Português
 日本
日本 韩国
韩国 български
 hrvatski
 esky
esky Dansk
Dansk Nederlands
 suomi
suomi Ελληνικ
 印度
印度 norsk
norsk Polski
 Roman
Roman русский
 Svenska
Perkins2206D柴油发动机CH12895引擎控制组件ECM供应商,Perkins2206D柴油发动机CH12895引擎控制组件ECM技术价格规格咨询服务,Perkins2206D柴油发动机CH12895引擎控制组件ECM零配件供应,Perkins2206D柴油发动机CH12895引擎控制组件ECM售后服务中心,Perkins2206D柴油发动机CH12895引擎控制组件ECM,Perkins2206D柴油发动机CH12895引擎控制组件ECM详细的技术参数,

产品中心
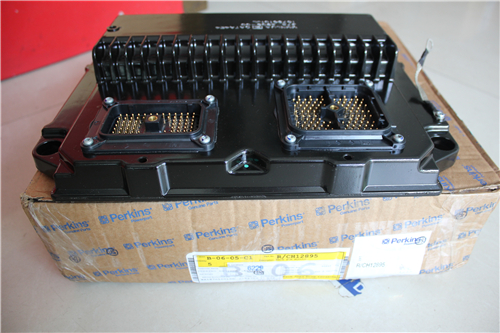
Perkins2206D柴油发动机CH12895引擎控制组件ECM
详细描述
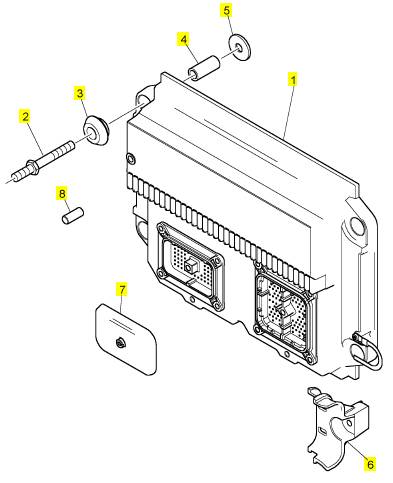
项目 零配件号码 新件号 描述
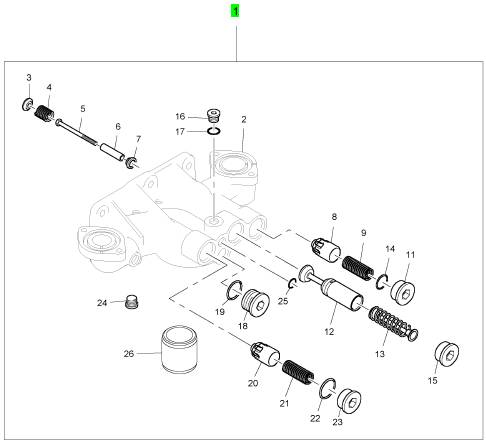
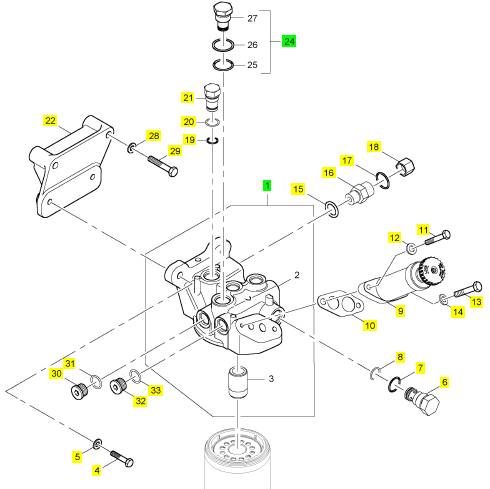
1 CH12895 1 CH12895 引擎控制组件ECM
2 CH10297 4 CH10297 图钉
3 CH10272 8 CH10272
4 CH10108 4 CH10108 间隔器
5 CH10279 8 CH10279 垫圈
6 CH11932 2 CH11932 托架
7 CH12655 1 CH12655 盖
8 CH12370 4 CH12370 帽
项目 零配件号码 新件号 描述
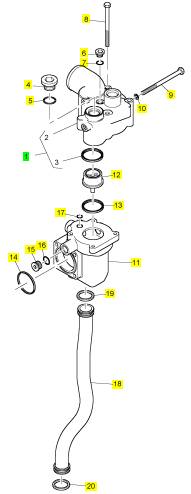
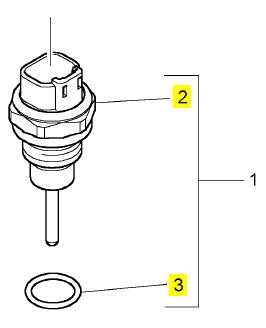
1 T401652 1 T401652 节温器壳
4 CH12474 2 CH12474 栓塞
5 CH11621 2 CH11621 密封O型圈
6 CH10285 1 CH10285 栓塞
7 CH10161 1 CH10161 密封O型圈
8 CH12171 4 CH12171 螺拴
9 CH12175 4 CH12175 螺拴
10 CH10277 4 CH10277 垫圈
11 CH12167 1 CH12167 调整器
12 CH11620 1 CH11620 节温器
13 CH12166 1 CH12166 密封垫 - 节温器壳
14 CH12165 1 CH12165 密封垫 - 节温器壳
15 CH10287 3 CH10287 栓塞
16 CH10146 3 CH10146 密封O型圈
17 CH12661 1 CH12661 密封O型圈
18 CH12168 1 CH12168 管
19 CH10201 1 CH10201 密封O型圈
20 CH10201 1 CH10201 密封O型圈
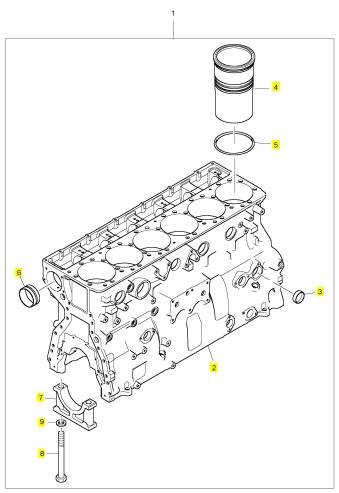
项目 零配件号码 新件号 描述
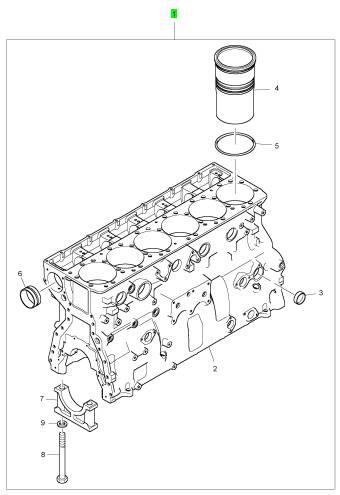
1 CH12684 1 CH12684 缸体组合 - O 圈
项目 零配件号码 新件号 描述
2 1 缸体
3 CH11752 5 CH11752 栓塞
4 CH12489 6 CH12489 缸套 - 压八配合
5 CH12488 6 T400359 密封垫 -油
6 CH12630 7 CH12630 凸轮轴衬套
7 7 轴承盖
8 CH12631 14 CH12631 螺拴
9 CH12632 14 CH12632 垫圈
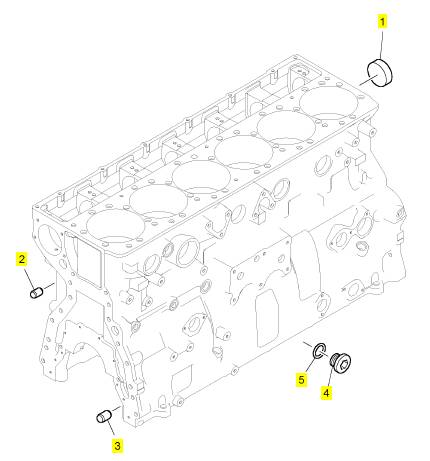
项目 零配件号码 新件号 描述
1 CH10032 3 CH10032 栓塞
2 CH11713 2 CH11713 合钉
3 CH11714 6 CH11714 合钉
4 T400363 3 T400363 栓塞
5 T409314 3 T409314 密封O型圈
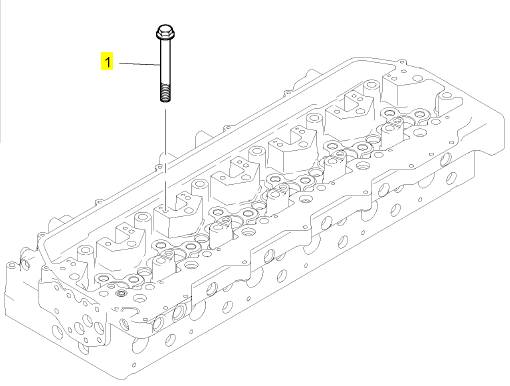
项目 零配件号码 新件号 描述
1 CH12287 6 CH12287 螺拴
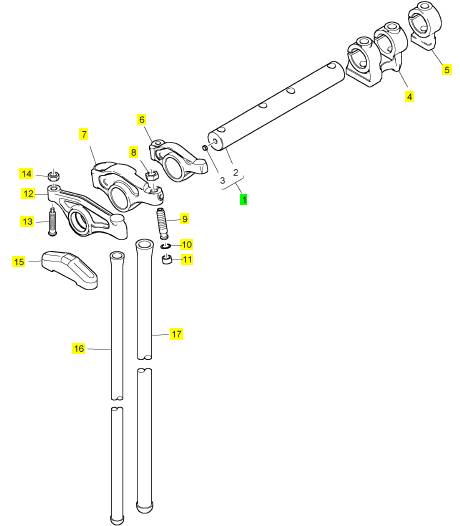
项目 零配件号码 新件号 描述
1 CH12481 1 CH12481 轴
4 CH12484 1 CH12484 摇臂座
5 CH12483 2 CH12483 轴环
6 T400226 1 T400226 摇臂
7 CH12511 1 CH12511 摇臂
8 CH12509 1 CH12509 螺帽
9 CH12512 1 CH12512 螺旋
10 CH10229 1 CH10229 密封O型圈
11 CH12702 1 CH12702 枢
12 CH12514 1 CH12514 摇臂
13 CH12513 2 CH12513 螺旋
14 CH11865 2 CH11865 螺帽
15 CH12278 12 CH12278 结轴块
16 CH12795 12 CH12795 PUSHROD
17 CH12808 6 CH12808 PUSHROD
项目 零配件号码 新件号 描述
1 CH12586 1 CH12586 轴
4 CH12590 1 CH12590 托架
5 CH11807 7 CH11807 螺拴
6 CH12587 12 CH12587 滚子
7 CH12585 6 CH12585 滚子
8 CH12589 5 CH12589 托架
9 CH12588 1 CH12588 托架
10 CH12591 1 CH12591 合钉
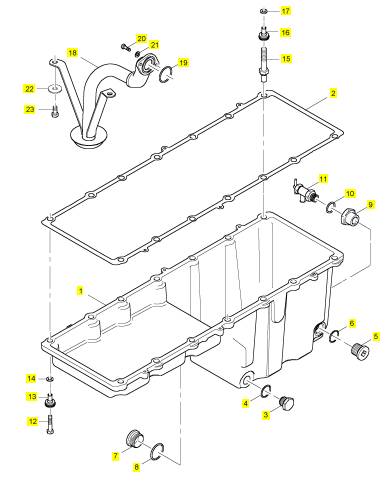
项目 零配件号码 新件号 描述
1 CH12117 1 CH12117 油底壳
2 CH12118 1 CH12118 密封垫 -油底壳
3 CH11571 1 CH11571 排泄栓塞
4 CH11573 1 CH11573 密封O型圈
5 T400251 1 T400251 栓塞
6 T400544 1 T400544 密封O型圈
7 T400251 1 T400251 栓塞
8 T400544 1 T400544 密封O型圈
9 T401275 1 T401275 承接器
10 T406205 1 T406205 密封O型圈
11 2461 A503 1 2461 A503 关闭阀
12 CH12124 13 CH12124 螺拴
13 CH12119 13 CH12119 密封垫
14 CH10113 13 CH10113 垫圈
15 CH12657 1 CH12657 图钉
16 CH12119 1 CH12119 密封垫
17 CH10113 1 CH10113 垫圈
18 T400250 1 T400250 管 - 油的吸入
19 CH10098 1 CH10098 密封O型圈
20 CH10041 2 CH10041 螺拴
21 T401636 2 T401636 垫圈
22 CH10099 2 CH10099 垫圈
23 CH12122 2 CH12122 螺拴
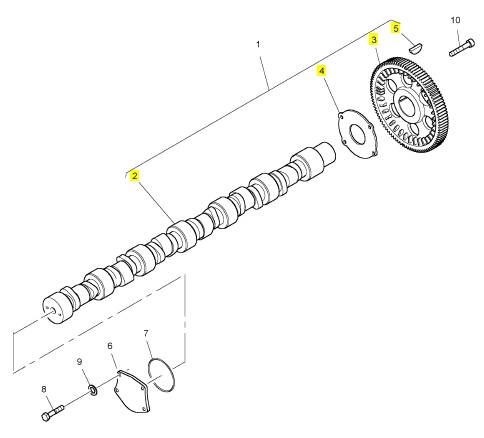
项目 零配件号码 新件号 描述
1 CH12436 1 CH12436 凸轮轴
6 CH12435 1 CH12435 盖
7 CH12437 1 CH12437 密封O型圈
8 CH11815 4 CH11815 螺拴
9 CH10277 4 CH10277 垫圈
10 CH12438 4 CH12438 螺拴
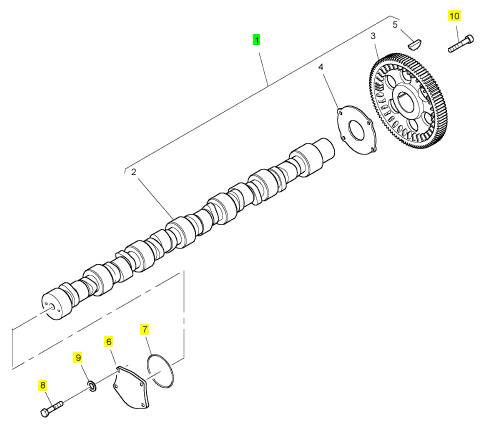
项目 零配件号码 新件号 描述
2 1 凸轮轴
3 CH12520 1 CH12520 凸轮轴传动机构
4 CH12519 1 CH12519 推力垫圈
5 CH10005 1 CH10005 半圆键
项目 零配件号码 新件号 描述
1 T401701 1 T401701 燃油滤清器
项目 零配件号码 新件号 描述
1 T401729 1 T401729 承接器
2 T400248 1 T400248 密封O型圈
3 T401731 1 T401731 管
4 T401735 2 T401735 摇臂座
5 T401734 1 T401734 水管
6 T401730 1 T401730 承接器
7 T400248 1 T400248 密封O型圈
8 T401725 1 T401725 阀
9 T401736 4 T401736 螺拴
10 CH10303 4 CH10303 垫圈
11 T401724 1 T401724 密封垫
12 T401732 1 T401732 螺拴
13 CH11819 1 CH11819 垫圈
14 T401737 1 T401737 螺拴
15 CH11819 1 CH11819 垫圈
16 T401723 1 T401723 管集箱箱
20 T401726 1 T401726 连接器
21 T400248 1 T400248 密封O型圈
22 T401733 1 T401733 水管
23 T401735 2 T401735 摇臂座
24 T401728 1 T401728 管
25 T401727 1 T401727 承接器
26 T401291 1 T401291 密封O型圈
项目 零配件号码 新件号 描述
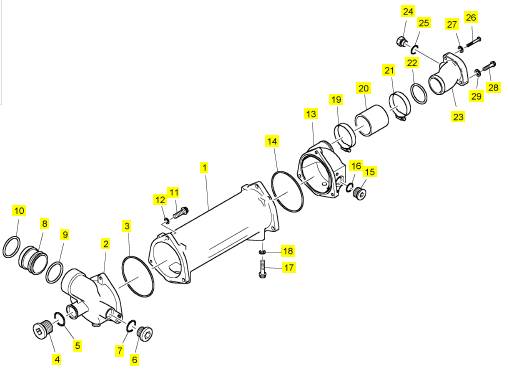
1 T400172 1 T400172 机油冷却器
2 T400162 1 T400162 端帽
3 T400173 1 T400173 密封O型圈
4 CH10291 1 CH10291 栓塞
5 CH12240 1 CH12240 密封O型圈
6 CH12474 1 CH12474 栓塞
7 CH11621 1 CH11621 密封O型圈
8 CH10395 1 CH10395 联结器
9 CH12238 1 CH12238 密封O型圈
10 CH12238 1 CH12238 密封O型圈
11 CH11565 6 CH11565 螺拴
12 CH10277 6 CH10277 垫圈
13 T400175 1 T400175 端帽
14 T400173 1 T400173 密封O型圈
15 CH11375 1 CH11375 栓塞
16 CH10119 1 CH10119 密封O型圈
17 CH12447 4 CH12447 螺拴
18 CH10277 4 CH10277 垫圈
19 T400174 1 T400174 摇臂座
20 CH12662 1 CH12662 水管
21 T400174 1 T400174 摇臂座
22 CH12231 1 CH12231 密封O型圈
23 T401049 1 T401049 水肘管
24 CH10285 1 CH10285 栓塞
25 CH10161 1 CH10161 密封O型圈
26 CH10140 1 CH10140 螺拴
27 CH10277 1 CH10277 垫圈
28 CH12447 1 CH12447 螺拴
29 CH10277 1 CH10277 垫圈
项目 零配件号码 新件号 描述
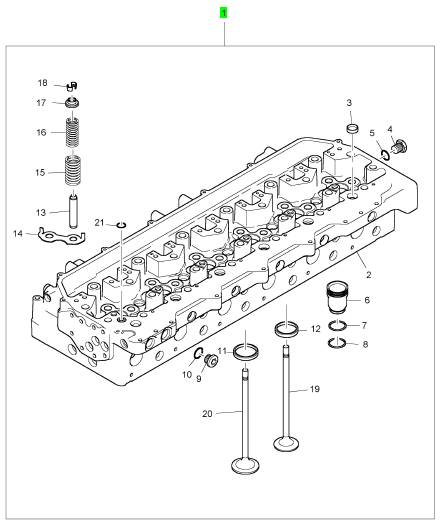
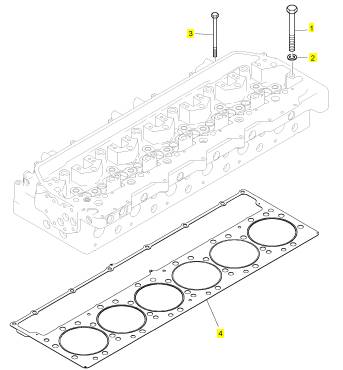
1 CH12455 1 CH12455 汽缸盖组合
(1) CH12455 1 CH12455 汽缸盖装备 -EXCH
项目 零配件号码 新件号 描述
1 CH12569 26 CH12569 汽缸盖螺拴
2 CH12571 26 CH12571 垫圈
3 CH12570 8 CH12570 螺拴
4 CH12454 1 CH12454 密封垫 - 汽缸盖
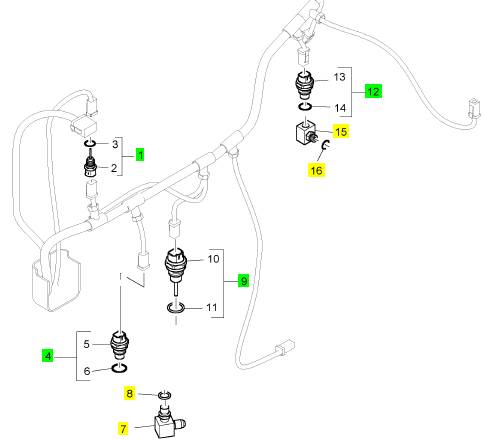
项目 零配件号码 新件号 描述
1 KRP1688 1 KRP1688 温度感应传感器
4 KRP1699 1 KRP1699 油压感应传感器装备
7 T401655 1 T401655 肘管
8 T409314 1 T409314 密封O型圈
9 KRP1687 1 KRP1687 温度感应传感器
12 KRP1693 1 KRP1693 气压感应传感器装备
15 CH12642 1 CH12642 承接器
16 CH11880 1 CH11880 密封O型圈
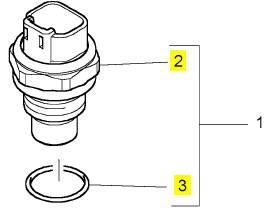
项目 零配件号码 新件号 描述
2 CH12652 1 CH12652 气压感应传感器
3 CH11880 1 CH11880 密封O型圈
3 CH10133 1 CH10133 密封O型圈
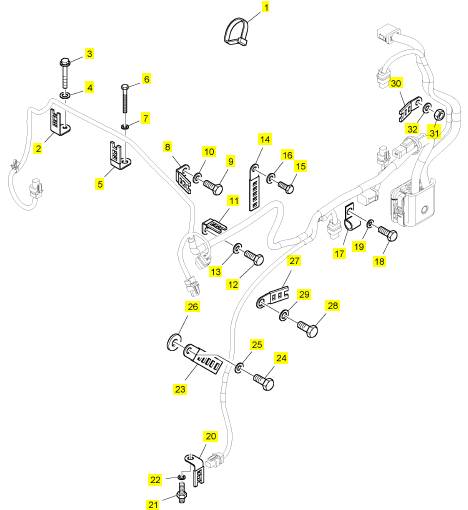
项目 零配件号码 新件号 描述
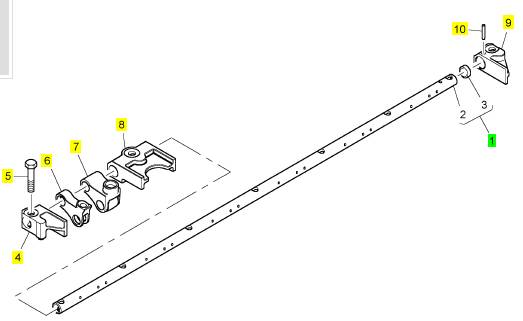
1 CH10054 13 CH10054 缆拉杆
2 T401576 2 T401576 接线夹
3 CH12286 2 CH12286 螺拴
4 CH10303 2 CH10303 垫圈
5 CH10420 1 CH10420 接线夹
6 CH11814 1 CH11814 公制的螺拴
7 CH10277 1 CH10277 垫圈
8 CH10072 1 CH10072 夹
9 CH12203 1 CH12203 螺拴
10 CH11819 1 CH11819 垫圈
11 CH10420 1 CH10420 接线夹
12 CH12203 1 CH12203 螺拴
13 CH11819 1 CH11819 垫圈
14 T401660 1 T401660 接线夹
15 CH12203 1 CH12203 螺拴
16 CH11819 1 CH11819 垫圈
17 T401662 1 T401662 接线夹
18 CH12203 1 CH12203 螺拴
19 CH11819 1 CH11819 垫圈
20 CH10420 1 CH10420 接线夹
21 CH12671 1 CH12671 图钉
22 CH10277 1 CH10277 垫圈
23 T401660 1 T401660 接线夹
24 CH11299 1 CH11299 螺拴
25 CH11819 1 CH11819 垫圈
26 T401297 1 T401297 垫圈
27 T401661 1 T401661 接线夹
28 CH10922 1 CH10922 螺拴
29 CH10099 1 CH10099 垫圈
30 T410794 1 T410794 接线夹
31 CH11865 1 CH11865 螺帽
32 CH11819 1 CH11819 垫圈
项目 零配件号码 新件号 描述
1 T401716 1 T401716 燃料过滤器
4 CH12612 2 CH12612 螺拴
5 CH11819 2 CH11819 垫圈
6 CH10836 1 CH10836 阀
7 T400188 1 T400188 密封O型圈
8 T400684 1 T400684 密封O型圈
9 CH10439 1 CH10439 汽酒共腾泵
10 CH10008 1 CH10008 密封垫
11 CH10246 1 CH10246 螺拴
12 CH10086 1 CH10086 垫圈
13 CH11565 1 CH11565 螺拴
14 T401636 1 T401636 垫圈
15 T408416 1 T408416 密封O型圈
16 T407241 1 T407241 连接器
17 CH11880 1 CH11880 密封O型圈
18 T409325 1 T409325 帽
19 T400857 1 T400857 密封O型圈
20 T400695 1 T400695 密封O型圈
21 T400694 1 T400694 栓塞
22 T401715 1 T401715 托架
23 T400188 1 T400188 密封O型圈
24 CH12017 1 CH12017 非回路阀
28 CH11819 2 CH11819 垫圈
29 ST43558 2 ST43558I 螺拴
30 CH10287 1 CH10287 栓塞
31 T406205 1 T406205 密封O型圈
32 CH10287 1 CH10287 栓塞
33 T406205 1 T406205 密封O型圈
项目 零配件号码 新件号 描述
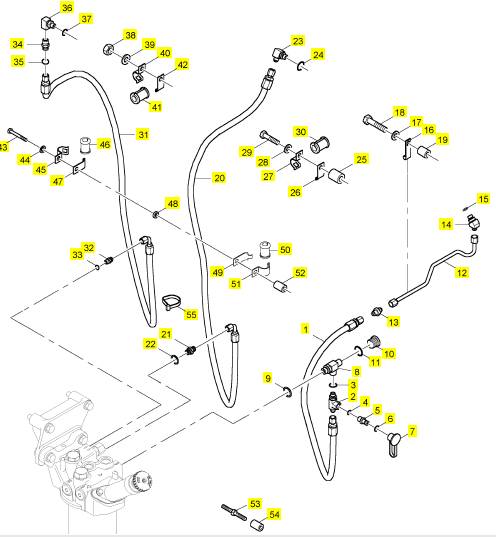
1 T401702 1 T401702 水管
2 T401708 1 T401708 承接器
3 CH11880 1 CH11880 密封O型圈
4 CH11880 1 CH11880 密封O型圈
5 CH11410 1 CH11410 栓塞
6 CH11880 1 CH11880 密封O型圈
7 CH11411 1 CH11411 灰尘盾
8 T401711 1 T401711 承接器
9 T406205 1 T406205 密封O型圈
10 CH10286 1 CH10286 栓塞
11 CH11880 1 CH11880 密封O型圈
12 T401717 1 T401717 管
13 T401704 1 T401704 承接器
14 T400646 1 T400646 承接器
15 CH11880 1 CH11880 密封O型圈
16 T401703 1 T401703 管夹
17 CH11819 1 CH11819 垫圈
18 CH11807 1 CH11807 螺拴
19 T401448 1 T401448 间隔器
20 T401714 1 T401714 水管
21 CH11595 1 CH11595 连接器
22 T406205 1 T406205 密封O型圈
23 CH10841 1 CH10841 连接
24 CH11880 1 CH11880 密封O型圈
25 T401448 1 T401448 间隔器
26 T400658 1 T400658 托架
27 T400659 1 T400659 托架
28 CH11819 1 CH11819 垫圈
29 CH11807 1 CH11807 螺拴
30 T400660 1 T400660 衬套
31 T401714 1 T401714 水管
32 CH10026 1 CH10026 连接
33 CH11880 1 CH11880 密封O型圈
34 CH10026 1 CH10026 连接
35 CH11880 1 CH11880 密封O型圈
36 T401713 1 T401713 肘管
37 CH10133 1 CH10133 密封O型圈
38 CH11865 1 CH11865 螺帽
39 CH11819 1 CH11819 垫圈
40 T400659 1 T400659 托架
41 T400660 1 T400660 衬套
42 T400658 1 T400658 托架 &, amp;, nbsp;
43 T401705 1 T401705 螺拴
44 CH10255 1 CH10255 垫圈
45 T400659 1 T400659 托架
46 T400660 1 T400660 衬套
47 T400658 1 T400658 托架
48 T401712 1 T401712 间隔器
49 T400658 1 T400658 托架
50 T400660 1 T400660 衬套
51 T400659 1 T400659 托架
52 T401707 1 T401707 间隔器
53 T401720 1 T401720 杆
54 T401706 1 T401706 间隔器
55 CH10054 2 CH10054 缆拉杆
项目 零配件号码 新件号 描述
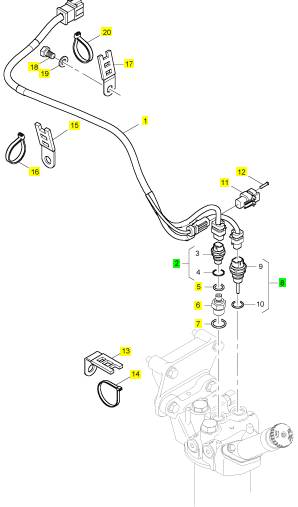
1 T401709 1 T401709 线束
2 KRP1699 1 KRP1699 油压感应传感器装备
5 T409314 1 T409314 密封O型圈
6 T400689 1 T400689 承接器
7 T406205 1 T406205 密封O型圈
8 KRP1687 1 KRP1687 温度感应传感器
11 28170044 1 28170044 电力有关连接器
12 2900 A011 2 2900 A011 销
13 CH10420 1 CH10420 接线夹
14 CH10054 1 CH10054 缆拉杆
15 T410794 1 T410794 接线夹
16 CH10054 1 CH10054 缆拉杆
17 T410794 1 T410794 接线夹
18 CH12203 1 CH12203 螺拴
19 CH11819 1 CH11819 垫圈
20 CH10054 1 CH10054 缆拉杆
项目 零配件号码 新件号 描述
2 1 感应传感器
3 CH10132 1 CH10132 密封O型圈
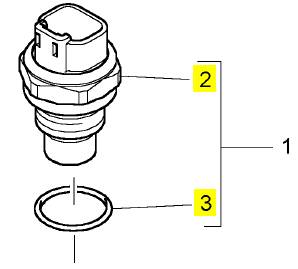
项目 零配件号码 新件号 描述
2 1 温度感应传感器
3 T406205 1 T406205 密封O型圈
3 CH10230 1 CH10230 密封O型圈
项目 零配件号码 新件号 描述
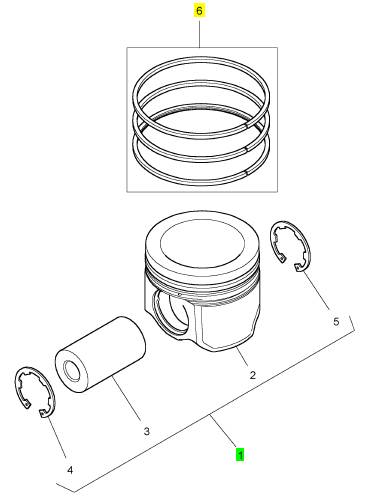
1 T401573 6 T401573 活塞装备
6 T401572 6 T401572 活塞环装备
项目 零配件号码 新件号 描述
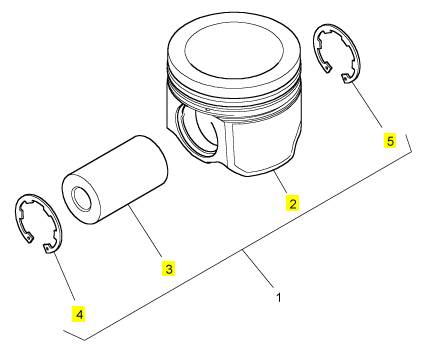
1 T401573 6 T401573 活塞装备
6 T401572 6 T401572 活塞环装备
项目 零配件号码 新件号 描述
2 1 活塞
3 CH12332 1 CH12332 轴头销
4 CH12331 1 CH12331 CIRCLIP
5 CH12331 1 CH12331 CIRCLIP
项目 零配件号码 新件号 描述
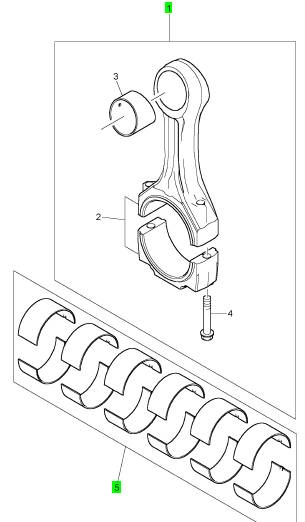
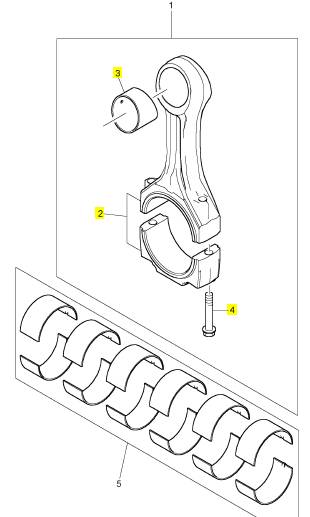
1 CH12635 6 CH12635 连杆组合
5 KRP3023 1 KRP3023 大头轴承装备
(5) KRP3023/051 1 KRP3023/051 大头 BRG 装备 -U/S
(5) KRP3023/076 1 KRP3023/076 大头 BRG 装备 -U/S
项目 零配件号码 新件号 描述
2 1 连杆
3 1 连杆小的一端衬套
4 CH12499 2 CH12499 连杆螺拴
项目 零配件号码 新件号 描述
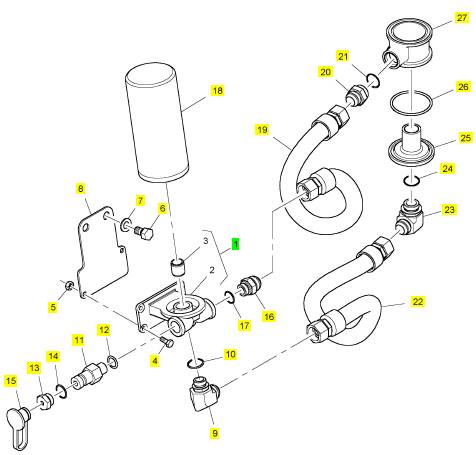
1 T401692 1 T401692 燃油滤清器
4 CH11299 2 CH11299 螺拴
5 CH11865 2 CH11865 螺帽
6 T401694 2 T401694 螺拴
7 T401001 2 T401001 垫圈
8 T401700 1 T401700 板
9 T401696 1 T401696 承接器
10 T400544 1 T400544 密封O型圈
11 CH10822 1 CH10822 工具
12 T409314 1 T409314 密封O型圈
13 T401693 1 T401693 承接器
14 T400544 1 T400544 密封O型圈
15 2658 A101 1 2658 A101 帽
16 T401697 1 T401697 承接器
17 T400544 1 T400544 密封O型圈
18 4587260 1 4587260 滤油器
19 T401695 1 T401695 水管 -油
20 T401698 1 T401698 承接器
21 T400762 1 T400762 密封O型圈
22 T401695 1 T401695 水管 -油
23 T401699 1 T401699 承接器
24 T400762 1 T400762 密封O型圈
25 T401691 1 T401691 盖
26 T401690 2 T401690 密封O型圈
27 T401689 1 T401689 承接器
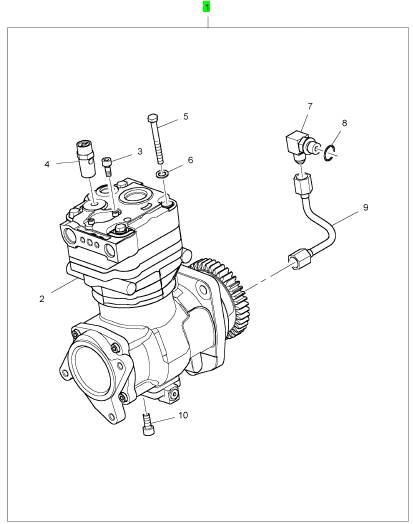
项目 零配件号码 新件号 描述
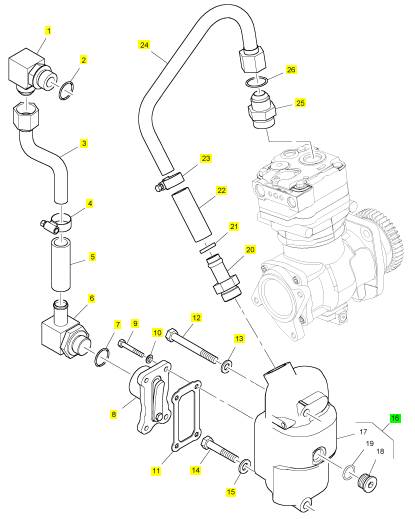
1 T400315 1 T400315 压缩机
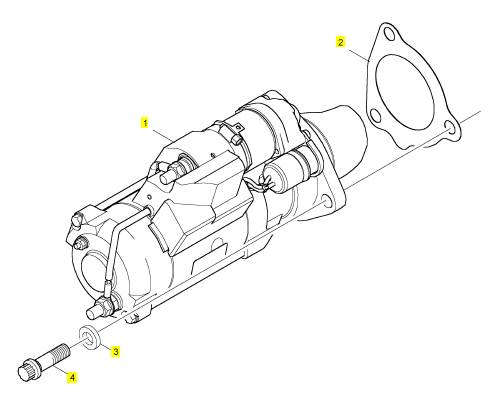
项目 零配件号码 新件号 描述
1 T400318 1 T400318 启动马达
2 CH10310 1 CH10310 密封垫
3 T400724 3 T400724 垫圈
4 T400720 3 T400720 螺拴
项目 零配件号码 新件号 描述
1 2488 A298 1 2488 A298 压缩机
2 T401634 1 T401634 栓塞
3 T401635 4 T401635 螺拴
4 T401636 4 T401636 垫圈

项目 零配件号码 新件号 描述
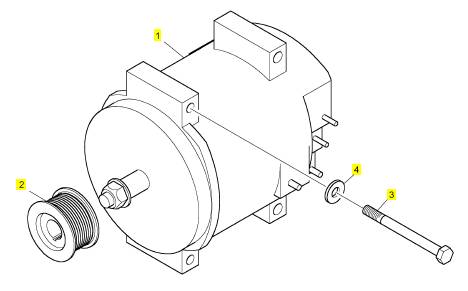
1 T400313 1 T400313 交流充电发电机
2 T401641 1 T401641 皮带轮
3 T401642 4 T401642 螺拴
4 T407566 4 T407566 垫圈
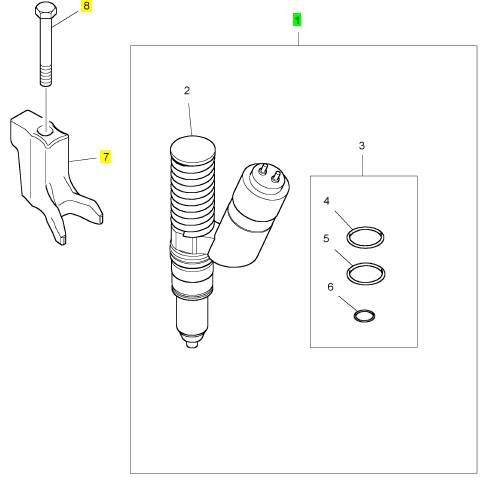
项目 零配件号码 新件号 描述
1 T401643 6 T401643 喷油器
(1) T401643R 6 T401643R 喷油器
7 CH12324 6 CH12324 喷油器摇臂座
8 CH12326 6 CH12326 螺拴
|
|
|
customer connector and the 70 pin customer
connector to 2.25 ± 0.25 N·m (20 ± 2 lb in).
Expected Result:
The ECM connector is secure and the allen head
screws are properly torqued.
Results:
• OK – The ECM connectors and the customer
connector is properly connected. Proceed to Test
Step 8.
• Not OK – The allen head screws for the ECM
connector or the customer connector is damaged.
Repair: Repair the connector or replace the
connector, as required. Verify that the repair
eliminates the fault.
STOP.
Test Step 8. Perform the “Wiggle Test”
on the Electronic Service Tool
A. Select the “Wiggle Tes t” from the diagnostic tests
on the electronic serv ice tool.
B. Choose the appropriate group of parameters to
monitor.
C. Press the “Start” button. Wiggle the wiring harness
in order to reproduce intermittent faults.
If an intermittent fault exists, the status will be
highlighted and an audible beep will be heard.
Expected Result:
No intermittent faults were indicated during the
“Wiggle Test”.
Results:
harness and connectors appear to be OK. If you
were sent from another procedure, return to the
procedure and c ontinue testing. If this test has
resolved the fault, return the engine to service.
STOP.
indicated.
Repair: Repair the harness or the connector. Verify
that the repair eliminates the fault.
STOP.
i02568609
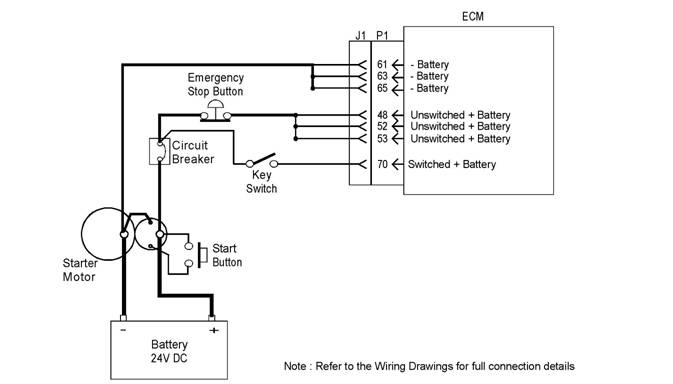
Electrical Power Supply Circuit
- Test
System Operation Description:
Use this procedure to troubleshoot any suspec ted
faults with the electrical power supply.
This procedure covers the following diagnostic codes:
• 0168-02 Electrical System Voltage erratic,
intermittent, or incorrect
This procedure tests whether proper voltage is being
supplied to the Electronic Control Module (ECM).
Unswitched battery voltage is supplied through the
customer connector to the ECM at P1-48, P1-52, and
P1-53. The negative battery is s upplied to the ECM
at P1-61, P1-63, and P1-65. The ECM receives the
input from the keyswitch at P1-70 when the keyswitch
is in the ON position or the START position. When
the ECM detects battery voltage at this input, the
ECM will power up. When battery voltage is removed
from this input, the ECM will power down.
The cause of an intermittent power supply to the ECM
can occur on either the positive side or the negative
side of the battery circuit. Both sides are routed from
the ECM to the battery. The three connections for
the unswitched +Battery s hould be routed through a
dedicated protective device (circuit breaker).
The engine ECM requires the keyswitch to be in the
ON position in order to maintain communications with
the electronic service tool.
This document has been printed from SPI². Not for Resale
![]()
![]()
![]()
![]()
![]() KENR6224
KENR6224
95
Troubleshooting Section
|
Schematic diagram for the electrical power supply
Connectors and the Wiring
A. Check all circuit breakers.
B. Check the battery.
C. Turn the keyswitch to the OFF position.
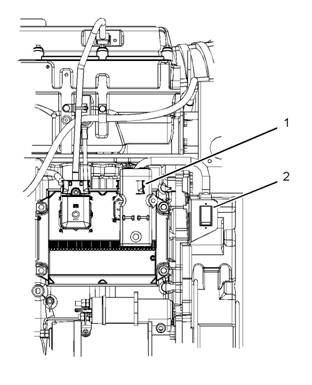
g01286846
Illustration 34
Left side view
(1) J1/P1 ECM connectors
(2) P61 customer connector
g01286858
This document has been printed from SPI². Not for Resale
![]()
![]()
![]()
![]() 96
96
Troubleshooting Section
KENR6224
D. Thoroughly inspect connectors (1) and (2).
Inspect the connections for the battery and
the connections to the keyswitch. Refer to the
Troubleshooting Guide, “Electrical Connectors -
Inspect” for details.
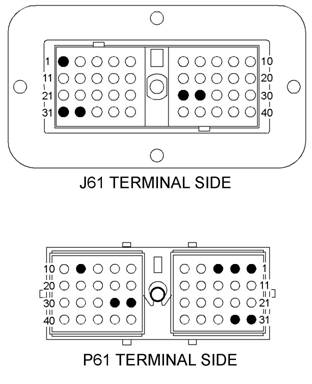
Illustration 36
g01216338
Illustration 35
g01104383
J61 and P61 terminals that are associated with the electrical
power supply
(1) +Battery
(26) Keyswitch
(27) Shutdown
(31) +Battery
(32) +Battery
E. Perform a 45 N (10 lb) pull test on each of the
wires that are associated with the electrical power
supply.
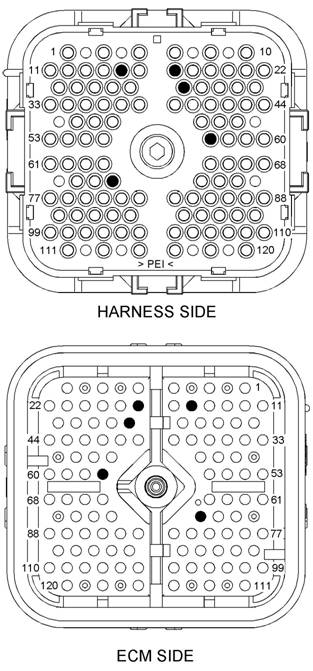
F. Check the allen head screw on each ECM
P1 terminals that are assoc iated with the electrical power supply
(P1-44) Shutdown
(P1-48) +Battery
(P1-52) +Battery
(P1-53) +Battery
(P1-61) −Battery
(P1-63) −Battery
(P1-65) −Battery
(P1-70) Keys witch
connector for the proper torque. Refer to the
Troubleshooting Guide, “Electrical Connectors -
Inspect” for the correct torque values.
G. Check the harnes s and wiring for abrasions and
for pinc h points from the battery to the ECM. Also,
check the harness and wiring for abrasions and
for pinch points from the key switch to the ECM.
Expected Result:
All connectors, pins, and sockets are completely
coupled and/or inserted, and the harness and wiring
are free of corrosion, of abrasion and of pinch points.
Results:
• OK – The connectors and wiring are OK. Proceed
to Test Step 2.
This document has been printed from SPI². Not for Resale
![]() KENR6224
KENR6224
97
Troubleshooting Section
•
Not OK
wiring.
– There is a fault in the connectors or
B. Load test the batteries.
Expected Result:
|
|
|
replace the connectors or wiring. Ensure that all of
the seals are properly in place and ensure that the
connectors are completely coupled.
STOP.
Test Step 2. Check the Battery Voltage at
the ECM
A. Disconnect the J1/P1 ECM connector.
B. Turn the keyswitch to the ON position.
C. Measure the voltage between P1-52 (Unswitched
Positive Battery) and P1-63 (Negative Battery).
D. Measure the voltage between P1-48 (Unswitched
Positive Battery) and P1-61 (Negative Battery).
E. Measure the voltage between P1-53 (Unswitched
Positive Battery) and P1-65 (Negative Battery).
F. Measure the voltage between P1-70 (Keyswitch)
and P1-63 (Negative Battery).
Expected Result:
The meas ured voltage is between 22.0 VDC and 27.0
VDC with no suspected intermittent faults at this time.
Results:
• OK – The ECM is receiving the correct voltage.
Repair: If an intermittent condition is suspected,
refer to the Troubleshooting Guide, “Electrical
Connectors - Inspect”.
STOP.
Step 3.
•
Repair: Check the circuit protection for the
circuit and for the wiring. Trace the wiring for the
keyswitch from the ECM through the keyswitch
circuit to the batteries. Find the fault and repair the
fault.
Verify that the repairs eliminate the fault.
STOP.
Test Step 3. Check the Batteries
A. Measure the no-load battery voltage at the battery
posts.
The batteries pass the load test. The measured
voltage is the minimum specification for a 24V
system.
Results:
• OK – The batteries are OK.
Repair: Check the wiring between the batteries
and the ECM for shorts.
Check the connectors between the batteries and
the ECM for moisture and/or corrosion.
Repair the wiring and/or the connectors.
Verify that the repair eliminates the fault.
STOP.
• Not OK – The battery voltage is low or the battery
did not pass the load test.
Repair: Recharge or replace the faulty batteries.
Verify that the repair eliminates the fault.
STOP.
i02568670
Engine Pressure Sensor Open
or Short Circuit - Test
System Operation Description:
Use this procedure to troubleshoot any suspect faults
with the following sensors:
• Engine oil pressure sensor
• Inlet manifold pressure sensor
• Atmospheric pres sure sensor
This procedure covers the following diagnostic codes:
• 0100-03 Engine Oil Pressure Sensor voltage
above normal
• 0100-04 Engine Oil Pressure Sensor voltage below
normal
• 0273-03 Turbocharger Outlet Pressure Sensor
voltage above normal
This document has been printed from SPI². Not for Resale
![]() 98
98
Troubleshooting Section
KENR6224
•
•
•
0273-04 Turbocharger Outlet Pres sure Sensor
voltage below normal
0274-03 Atmospheric Pressure Sensor voltage
above normal
0274-04 Atmospheric Pressure Sensor voltage
below normal
The troubleshooting procedures for the diagnostic
codes of each pressure sensor are identical. The
Engine Control Module (ECM) sends a 5 volt supply
to terminal 1 of each sensor. The sensor common
connection is connected to terminal 2 of each sensor.
The signal voltage from terminal 3 of each sensor is
sent to the appropriate terminal at the J2/P2 ECM
connector.
Pull-up Voltage
The ECM continuously outputs a pull-up voltage
on the circuit for the sensor signal wire. The ECM
uses this pull-up voltage in order to detect an open
in the signal circuit. When the ECM detects the
presence of a voltage that is above a threshold on the
signal circuit, the ECM will generate an open circuit
diagnostic code (03) for the sens or.
If the sensor is disconnected at the s ensor connector,
the presence of pull-up voltage at the sensor
connector indicates that the wires from the sensor
connector to the ECM are not open or shorted to
ground. If the sensor is disconnected at the sensor
connector, the absence of pull-up voltage at the
sensor connector indicates an open in the signal wire
or a short to ground. If the sensor is disconnected at
the sensor connec tor and the voltage at the sensor
connector is different from pull-up voltage, the signal
wire is shorted to another wire in the harness.
This document has been printed from SPI². Not for Resale
![]()
![]()
![]() KENR6224
KENR6224
99
Troubleshooting Section
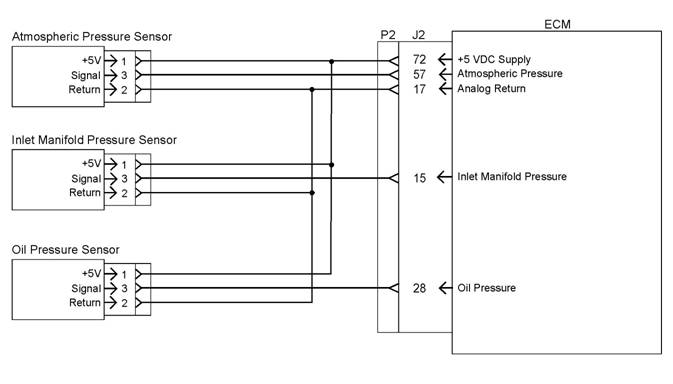
Illustration 37
Schematic for the engine pressure sensors
g01284368
This document has been printed from SPI². Not for Resale
![]()
![]()
![]()
![]() 100
100
Troubleshooting Section
KENR6224
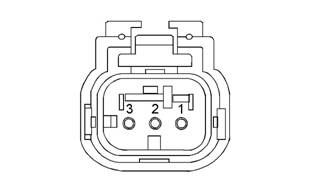
|
Sensor connector
(1) +5 VDC
(2) Common
(3) Signal
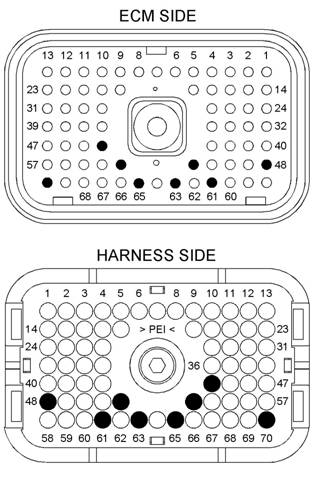
Connectors and Wiring
Electrical
g01287356
Illustration 38
P2 ECM connector
(P2-15) Signal from the inlet manifold pressure sensor
(P2-17) Sensor common
(P2-28) Signal from the oil pressure sensor
(P2-57) Atmospheric pressure sensor signal
(P2-72) +5 Volt sensor supply
g01287043
A. Turn the keyswitch to the OFF position.
B. Thoroughly inspect the J1/P1 ECM connector and
the J2/P2 ECM connector. Thoroughly inspect the
connectors for each analog sensor. Refer to the
Troubleshooting Guide, “Electrical Connectors -
Inspect” for details.
C. Perform a 45 N (10 lb) pull test on each of the
wires that are associated with the active diagnostic
code.
D. Check the allen head screw on each ECM
connector for the proper torque. Refer to the
Troubleshooting Guide, “Electrical Connectors -
Inspect” for the correct torque values.
E. Check the harness and wiring for abrasions and
for pinch points from each sensor back to the
ECM.
Expected Result:
All connectors, pins, and sockets are completely
coupled and/or inserted. The harness and wiring are
free of corrosion, of abrasion, and of pinch points .
Results:
• OK – The harnes s and wiring are OK. Proceed
to Test Step 2.
• Not OK – There is a fault in the connectors and/or
wiring.
This document has been printed from SPI². Not for Resale