 English
 Espaol
 Franais
 阿拉伯
阿拉伯 中文
中文 Deutsch
 Italiano
 Português
 日本
日本 韩国
韩国 български
 hrvatski
 esky
esky Dansk
Dansk Nederlands
 suomi
suomi Ελληνικ
 印度
印度 norsk
norsk Polski
 Roman
Roman русский
 Svenska
产品中心
怎样安装新的活塞和缸套组件步骤安装时所需要注意的事项约翰迪尔John Deere柴油机
怎样安装新的活塞和缸套组件步骤安装时所需要注意的事项约翰迪尔John Deere柴油机
重要事项:约翰迪尔John Deere柴油机活塞必须安装在拆下活塞的连杆上,并且必须使用新的活塞销卡环。
如果要安装新的约翰迪尔John Deere柴油机活塞和缸套组件,请勿将活塞从缸套上拆下。将活塞从衬套底部推出,直到足以安装活塞销。
2.用清洁的约翰迪尔John Deere柴油机机油润滑活塞销(A)和衬套。
3.通过活塞(B)和连杆(C)安装活塞销。确保杆的“前部”与活塞的箭头或“前部”对齐。
4.在凹槽中安装新的活塞销卡环(D)。确保卡环在活塞槽中膨胀。
注:全梯形压缩环(一个“Pip”标记)进入顶部活塞环槽。半梯形环(两个“Pip”或“Top”标记)进入活塞的第二个环槽。1号和2号压缩环上的“Pip”标记必须面向活塞顶部。
KS活塞环有颜色编码。第一枚戒指是蓝色的,第二枚是粉红色的,第三枚是橙色的。膨胀环是橙色的。
5.使用JDE93环膨胀机安装带有膨胀环(E)的控油环,然后安装压缩环。
注:新环具有正确的端隙,因此不需要安装到衬套上。
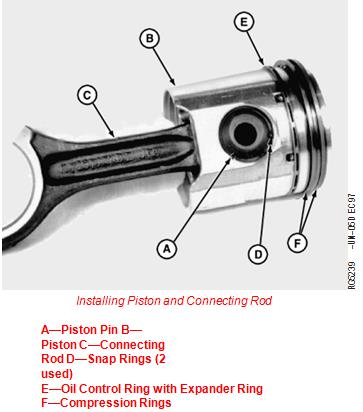
安装约翰迪尔John Deere柴油机活塞和连杆
A-约翰迪尔John Deere柴油机活塞销B-活塞C-连杆D-卡环(使用2个)
E-带膨胀环的机油控制环F-压缩环
2.如图所示错开活塞上的环间隙,使顶环间隙面向约翰迪尔John Deere柴油机前部。
注意:如果曲轴已拆下,请参见第040组中的“安装主轴承和曲轴”。
7.用清洁的约翰迪尔John Deere柴油机机油涂抹JDE96活塞环压缩机的活塞、衬套和内径。
8.小心地将带有活塞和连杆的环形压缩机放置在衬套上。
重要事项:在衬套中安装活塞和连杆时,确保曲轴轴颈和衬套壁没有损坏。
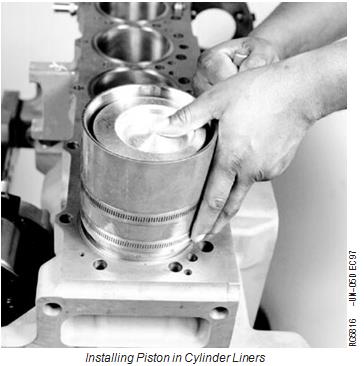
注意:确保活塞和连杆上的“前部”字样朝向约翰迪尔John Deere柴油机前部。
9.活塞在环形压缩机中居中,环正确交错,将活塞推入衬套,如图所示。
7.在轴承镶块(B)和匹配的曲轴连杆轴颈上涂抹清洁的约翰迪尔John Deere柴油机机油。
重要:关于精密接头 杆,确保盖在杆上正确对齐,联锁表面密封紧密,边缘对齐。不要反转杆上的盖。匹配杆和盖侧面的垫片。
安装盖时,确保杆和盖上的压印数字(C)位于同一侧。

8.安装连杆盖(A)。
安装带有轴承镶块的连杆盖
A-连杆盖,B-轴承嵌件,C-压印编号
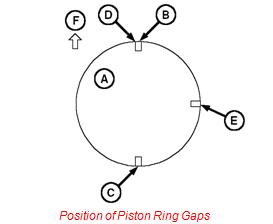
约翰迪尔John Deere柴油机活塞环间隙位置
A-活塞顶部B-顶部压缩环间隙C-油控制环间隙D-膨胀环间隙E-底部压缩环间隙F-约翰迪尔John Deere柴油机前部
重要事项:约翰迪尔John Deere柴油机最终装配时,不得使用连杆带帽螺钉超过一次。一旦将杆带帽螺钉拧紧至最终扭矩转动规格,则不得将其再次用于另一个最终装配。
12.将新的带帽螺钉和垫圈浸入清洁的约翰迪尔John Deere柴油机机油中。确保孔螺纹和带帽螺钉上的所有螺纹都已彻底上油。
重要事项:不要使用气动扳手安装连杆带帽螺钉。这样做可能会损坏螺纹。改用速度手柄扳手。
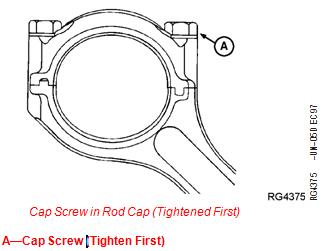
13.在榫槽连杆上:首先,将最靠近活塞端的带帽螺钉(A)拧紧至规格。接下来,拧紧另一个带帽螺钉。感觉杆到盖接头,检查是否正确对齐。
规格
榫槽连接杆带帽螺钉初始扭矩……27 N.m(20 lb-ft)
杆盖中的带帽螺钉(先拧紧)
带帽螺钉(先拧紧)
其次,将所有带帽螺钉拧紧至以下规格,然后将所有带头螺钉扭转90-100.
规格
榫槽连接
杆带帽螺钉最终扭矩..75牛顿·米(55磅-英尺)加上90–100
顺时针转动
参见扭转连杆盖
螺钉,将在本组中介绍。
14.关于精密接头 连杆:首先,将最靠近活塞端的带帽螺钉拧紧至规格。接下来,拧紧另一个带帽螺钉。感觉杆到盖接头,检查是否正确对齐。
规格
精密接头 连杆带帽螺钉扭矩……95牛顿·米(71磅-英尺)加上90–100
顺时针转动
IMPORTANT: Piston must be installed on same connecting rod from which they were removed and new piston pin snap rings must be used.
If a new piston and liner assembly is to be installed, DO NOT remove piston from liner. Push piston out of liner bottom only far enough to install piston pin.
2. Lubricate piston pin (A) and bushing with clean engine oil.
3. Install piston pin through piston (B) and connecting rod (C). Be sure “FRONT” of rod aligns with arrow or “FRONT” of piston.
4. Install NEW piston pin snap rings (D) in grooves. Make certain snap rings have expanded in grooves of piston.
NOTE: Full keystone compression ring (one “Pip” mark) goes in top piston ring groove. Half keystone ring (two “Pip” or “Top” marks) goes in second ring groove of piston.“Pip” mark(s) on No. 1 and No. 2 compression rings must face top of piston.
KS piston rings are color coded. The No. 1 ring is blue, No. 2 is Pink and No. 3 is Orange. The expander ring is orange.
5. Use the JDE93 Ring Expander to install oil control ring with expander ring (E) and then compression rings.
NOTE: New rings are furnished with the correct end gap, therefore, fitting to the liner is not necessary.
Installing Piston and Connecting Rod
A—Piston Pin B—Piston C—Connecting Rod D—Snap Rings (2 used)
E—Oil Control Ring with Expander Ring F—Compression Rings
2. Stagger ring gaps on piston as shown, with gap of top ring facing the front of the engine.
NOTE: If crankshaft was removed, see INSTALL MAIN BEARINGS AND CRANKSHAFT in Group 040.
7. Coat piston, liners and I.D. of JDE96 Piston Ring Compressor with clean engine oil.
8. Carefully place ring compressor with piston and rod over liner.
IMPORTANT: Be sure crankshaft journals and liner walls are not damaged when installing piston and rod in liner.
NOTE: Be sure the word “FRONT” on piston and rod face toward the front of the engine.
9. With piston centered in ring compressor and rings staggered correctly, push piston into liner as shown.
7. Apply clean engine oil to bearing inserts (B) and matching crankshaft rod journals.
IMPORTANT: On Precision Joint rods, make sure cap is properly aligned on rod with interlocking surfaces sealing tightly and edges aligned. Do Not reverse cap on rod. Match pads on side of rod and cap.
When installing caps, make sure stamped numbers (C) on rod and cap are positioned on the same side.
8. Install connecting rod caps (A).
Installing Connecting Rod Caps with Bearing Inserts
A—Connecting Rod Caps B—Bearing Inserts C—Stamped Numbers
Position of Piston Ring Gaps
A—Top of Piston
B—Top Compression Ring Gap C—Oil Control Ring Gap D—Expander Ring Gap
E—Bottom Compression Ring Gap F—Front of Engine
IMPORTANT: NEVER use connecting rod cap screws more than once for final engine assembly. Once rod cap screws have been tightened to final torque-turn specifications, they must not be reused for another final assembly.
12. Dip NEW cap screws and washers in clean engine oil. Make sure bore threads and all threads on cap screws are thoroughly oiled.
IMPORTANT: DO NOT use pneumatic wrenches to install connecting rod cap screws. Doing so may damaged threads. Use speed-handle wrench instead.
13. On tongue-and-groove connecting rods: Initially, tighten cap screw (A) closest to piston end to specifications. Next, tighten the other cap screw. Feel rod-to-cap joint to check for proper alignment.
Specification
Tongue-and-Groove Connecting
Rod Cap Screw—Initial Torque..... 27 N•m (20 lb-ft)
Cap Screw in Rod Cap (Tightened First)
A—Cap Screw (Tighten First)
Secondly, tighten all cap screws to the following specifications, then TORQUE-TURN all cap screws 90-100.
Specification
Tongue-and-Groove Connecting
Rod Cap Screw—Final Torque .. 75 N•m (55 lb-ft) plus 90–100
turn clockwise
See TORQUE-TURN CONNECTING ROD CAP
SCREWS, described next in this group.
14. On Precision Joint connecting rods: Initially, tighten cap screw closest to piston end to specifications. Next, tighten the other cap screw. Feel rod-to-cap joint to check for proper alignment.
Specification
Precision Joint Connecting Rod
Cap Screw—Torque ..... 95 N•m (71 lb-ft) plus 90–100
turn clockwise
9.0 升约翰迪尔John Deere柴油机使用 9560/9660 STS 联合收割机上的固定风扇驱动。风扇直径为 89 厘米(35 英寸),**小风扇转速为 1950 转/分。
9760 STS 联合收割机的风扇的直径更改为 96.5 厘米(38 英寸),这样可以处理 9760 联合收割机提供的较大冷却套件。和 9560/9660 STS 联合收割机一样,它是固定转速驱动,但风扇直径增加了,该风扇能够以 1800 转/分的转速运转,以在较高功率等级保持燃油经济性。接下来,我们将介绍 8030 拖拉机的冷却系统的变化。
拖拉机Vari-Cool™ 套件中山Perkins帕金斯403D-15约翰迪尔John Deere柴油机高压油泵、油泵组件电话,合肥Perkins帕金斯1106D-E70TAG3柴油机去哪买技术查询中心,克孜勒苏Perkins帕金斯1506A-E88TAG3约翰迪尔John Deere柴油机机油泵技术查询中心,六盘水Perkins帕金斯1206F-E70TTAG3约翰迪尔John Deere柴油机控制屏哪里有,重庆Perkins帕金斯854E-E34T约翰迪尔John Deere柴油机连杆衬套联系,凉山Perkins帕金斯4012-46TWG2A约翰迪尔John Deere柴油机水泵、水泵衬垫商家,宜宾Perkins帕金斯1104D-44TG3约翰迪尔John Deere柴油机气门室盖罩一般多少钱,成都卡特C13柴油机哪里能买到商家,河北Cat约翰迪尔John Deere柴油机原厂配件欢迎来电,邵阳Perkins帕金斯2506C-E15TAG4约翰迪尔John Deere柴油机电子供油泵、提升输油泵费用,萍乡Perkins帕金斯1103A-33TG2约翰迪尔John Deere柴油机哪里有做维修保养的去哪找,苏州帕金斯约翰迪尔John Deere柴油机四组合去哪找,孝感Perkins帕金斯1106D-E70TA约翰迪尔John Deere柴油机缸盖一般多少钱,六安Perkins1106S-66柴油机销售中心费用报价单,8030 拖拉机使用的是称为 Vari-Cool™ 的新型冷却套件。此系统包括:风扇驱动、散热器/冷却元件位置、导流罩、水泵、吸气管、约翰迪尔John Deere柴油机罩进气口和排气口/滤网。请注意,空气从约翰迪尔John Deere柴油机罩的前滤网和前上部流入,用于冷却约翰迪尔John Deere柴油机室前部元件。然后,这些空气通过约翰迪尔John Deere柴油机罩新的通气口导出,以使这部分空气从约翰迪尔John Deere柴油机罩后部的进气口散开。此气流将使更清洁的空气抽进空气滤清器,从而减少吸入的污垢并延长空气滤清器的保养间隔。格栅前部的进气区域更大,这将减慢空气流速,使得在田间作业条件下,进入的碎屑更少。